4 letter word game (Electronics Final)
By: Luis Hernandez, Nick Hammond, and Andres Correa
Problem Statement
You have been tasked with creating an electronic game for the Engineering classes at NNU. They want to create a game that can be played by potential
students to showcase what they could learn in an electronics class. Create an electronics game that uses elements from the past year of instruction. You will create a prototype as well as write up a paper discussing your project.
students to showcase what they could learn in an electronics class. Create an electronics game that uses elements from the past year of instruction. You will create a prototype as well as write up a paper discussing your project.
Constraints
-Make a game using what you have learned
-Can include partners
-Due May 24th
- Portfolio
-Can include partners
-Due May 24th
- Portfolio
Brain Storming
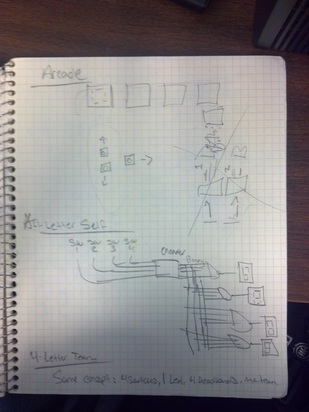
First Idea: Make a game that uses four different SSDs, and displays a certain amount of letters. Their will be four players and each one of the players will control one of the SSDs through a bread board. They will have to arrange themselves in a way that you will be able to spell something out.
Flaws of First Idea: The game is to simple cause each one of the players only controls one SSD and this might get boring. Also if each SSD has a different set of letters the amount of letters we can make become more limited.
Second Idea: Make a game that uses a set of four SSDs on one bread board. 2 of the SSDs will display a certain set of letters and the other two will display another set. This will only involve 2 players and each player will have 2 SSDs with each one of the letter sets. They will have to arrange themselves in a way that they will spell some thing.
Flaws of Second Idea: The 2 different set of letters will still restrict the players amount of words they can create. Also their are not enough letters to do two different sets.
Final Idea: Their will be one bread board with four SSDs on them. We will use one set of letters for all of the SSDs which will make us have a bigger range of possible words. Their will be four players but each one will have their own bread board with four SSDs on it. (note that we ran into problems and had to change are design along the way).They will have to find as many possible four letter words in 5 minutes.
Calculations
So first of all we had to decide which letters could be displayed in the Seven Segment Display we used this chart to help guide what letters we were going to choose. Since we are using four inputs (ABCD) we are limited to only 16 letters.
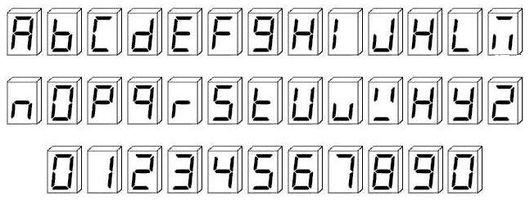
The 16 letters that we decided to use were: A, b, C, d, E, F, H, i, L, n, O, P, r, S, U, Y
Truth Table
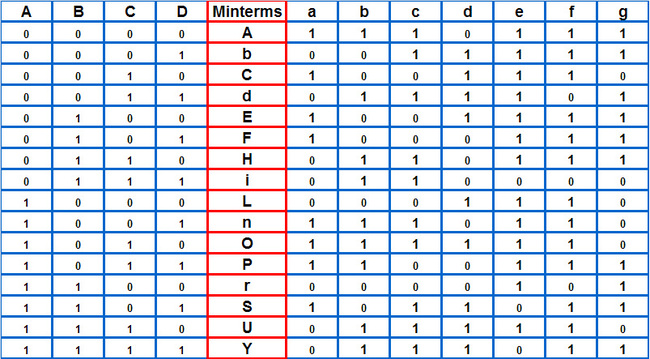
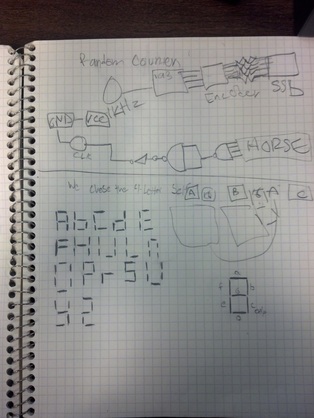
This is the truth table that we did for the game counter. Just as we did in the birthday project, we have to pick which segments on the SSD will light up on a certain count to make a letter. For example A is the first letter and we need segments a, b, c, e, f, and g to light up for the letter a to be displayed, so on the binary combination of 0000 a, b, c, e, f, and g must be a 1 and d is a 0. After this we had to do the k-map and do minterms.
K-Mapping/Minterms
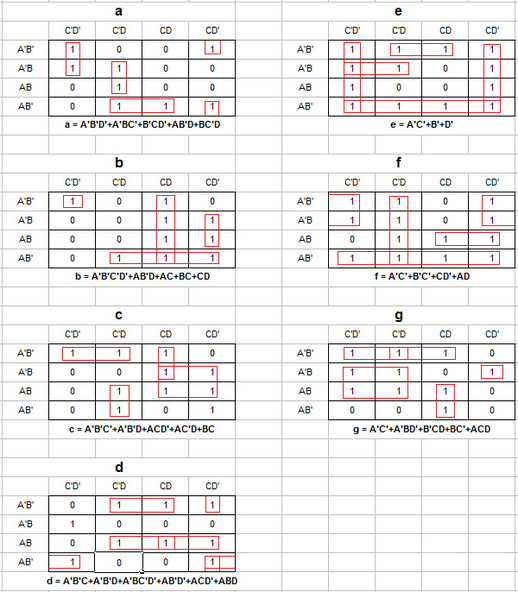
After the truth table we had to k-map it in order to get the minterms that we need and then simplify them. The first thing that we did was put all the possible combinations of the inputs ABCD. In this case their are four so we must put AB on one side and CD on the other. After that we plotted the 1s were they are going to be lit on the SSD. For example A is lit on the binary combinations 0000, 0010, 0100,0101, 1001, 1010, 1011, and 1101 and this translates to A'B'C'D', A'B'CD', A'BC'D', A'BC'D, AB'C'D, AB'CD', AB'CD, and ABC'D which we plotted on the K-map. After that we grouped the 1s in pairs of two or grater and by themselves if it is not possible. Then we canceled out the minterms and got our simplified minters as show below each one of the segment k-maps. After that we had to build the simulation in Multisim.
Documentation
Multisim(CDS)
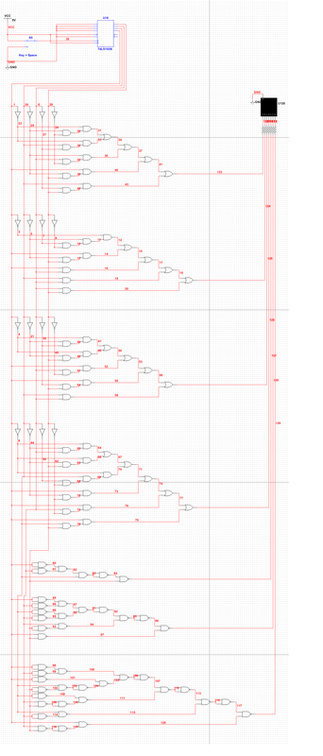
This is the circuit that we built on the Multisim program. The first thing that we had to put was the 74LS193 IC to make the circuit count. As you can see ABCD are all set to 0 so we can reach the maximum count of 16 which is the last letter Y.Both RTIOs are connected to VCC so this means that the count will reset at 0 or A. After that we had to transfer are minterms to AOI and NAND logic. It was pretty simple cause we discovered the logic converter which is a tool that converts the Minterms to logic circuits. This cut our work probably in half cause what would normally take 20 minutes only took about 10. After that we had to put an SSD and run the simulation to see if it works. Note that the circuit does not have a reset button, but it was added on the PLD design.
Simulation
This is the video of the 4 word game simulation. As you can see the counter is displaying the words that we need it to display. The reset switch will be added on the PLD.
PLD
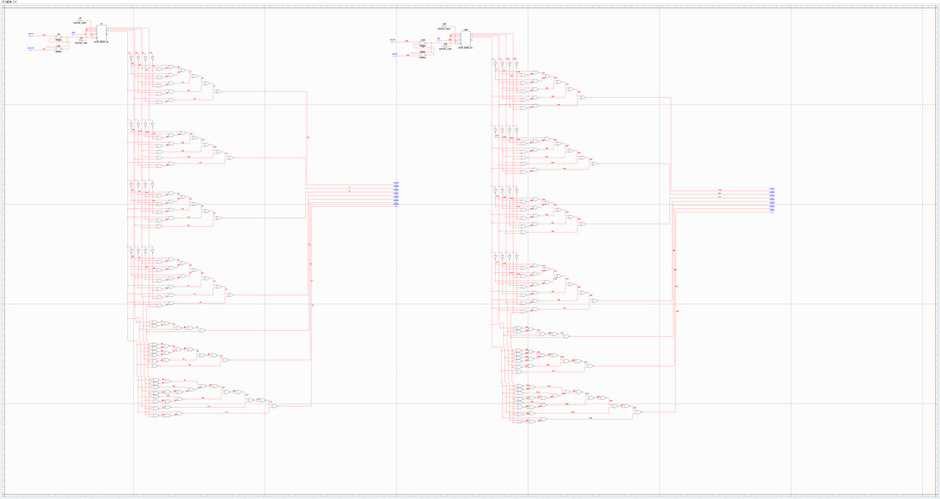
This is the PLD design that was made based of Multisim(CDS).We used two different DLB boards and each one has two SSDs so will only need two counters circuits on each breadboard. As you can see we switched out the SSD and put on the segments that will be lit up on the DLB. Also Since it is a counter we had to put a debouncer as we previously learned with the Now Serving Display project. The GPIOs go to the button which will make the letters change and the Switch will restart the count at A.
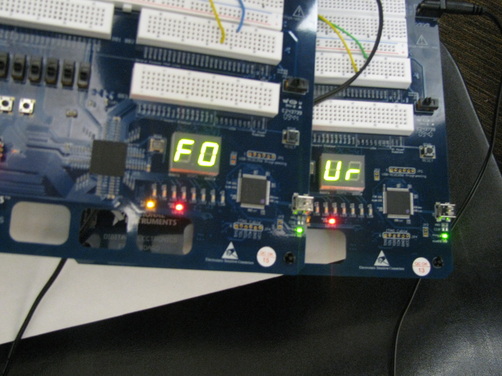
Final Design
Four Letter Word Game
Reflection
This project was a really good project in my mind. Although it is based on older stuff and not on the recent counters it was nice to go back and see that we could still use what we had learned before and make a game out of it. This game is based of the Birthday Project that we had to do. In the Birthday project we had to make the SSD display our birthday yet still go in binary order. To do this we had to make certain segments light up on certain times using K-Mapping. The project in its self seemed pretty hard at the beginning but after analyzing and remembering the Birthday circuit it really wasn't that hard just very time consuming. The part that was actually very hard was the bread boarding. If we were to manually bread board this it would have taken for ever and we didn't know if Mr. Wemp had enough ICs so we decided to take a digital approach. We knew we had to use the DLB board and that we had a counter in it so we were going to have to debouncer if we didn't want the circuit to jump. When we programed the DLB we tested the circuit on the SSD that the DLB had and it worked fine. The problem with this is that we had to make a four letter game and the DLB only had two green ones. In order to do that we put four SSDs on the DLBs bread board and theoretically we were just going to wire the GPIOs to the BUTTON and SSD and the four letter word game would be done. This is not what happened though cause once we did that that the SSDs would not count. At first we thought that we did something wrong. We checked the circuit but the simulation worked so their was nothing wrong with that. On the DLB the SSDs were wired correctly so their was nothing wrong with that. We thought it might be the GPIOs or the switches so we switched them to Clocked GPIOs but the game still didn't work. We went back to testing it on the two green SSDs that were on the DLB and the circuit worked fine. We programed the circuit again and tried to use the red SSD but it didn't work. We found out that every time we programmed the board different counters started working and other stopped even though we didn't touch the board. We knew that the DLBs were faulty sometimes but this was on another level. We decided that it was impossible to use the four red SSDs cause even if we fixed the problem, the board was the one making the mistake so we just used the two green SSDs on the DLB that we knew already worked and used two DLBs. In the end the game didn't come out exactly as we wanted it cause we wanted all the SSDs to be on one board but I think the concept is still their and we proved that we have learned a lot in this Digital Electronics class.
Digital Electronics Conclusion
This class has really taught me a lot. Mr. Wemp has been a great teacher and thanks to that I learned well. One obstacle that I and other kids from Nampa high had to over come was that we didn't really get to come into the class as the kids form Columbia cause we g=had to come all the way from Nampa. This being said I was also lacking sleep some times and since this was my first class of the day, I sometimes couldn't keep my eyes open and pay attention that well. Their was a point in the class were I was so far behind that I felt like I should drop the class but thanks to Mr. Wemp and me coming in after school I was able to finish this class strong and get my college credit.
